Sunday, August 21, 2011

Brush Class, Part Deux


It’s all supremely important stuff that I know you’ll spend the rest of the afternoon digging through. For reals. I never new how many blush brushes a gal really needs in her life, did you?
So get on over there for the full gamut of tips. I guarantee you’ll be inspired to try out smoky eyes, actually blow dry your hair (ahem. me.) or at least give yourself a fresh pedi with this homemade lemon salt scrub (that or get yourself to the nail salon. ahem. me again.).

blush brush make up tips


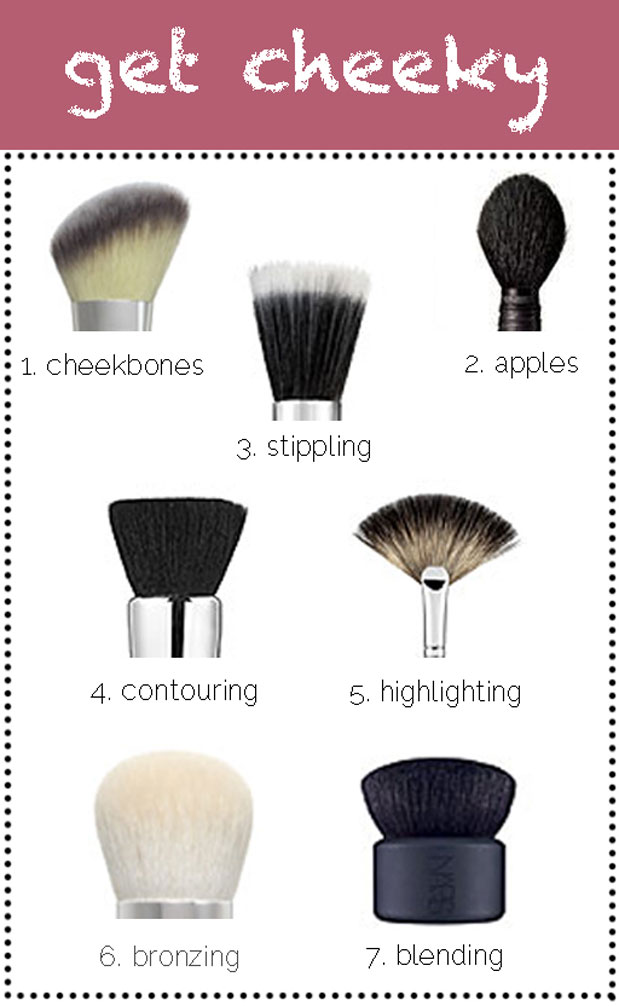
Welcome back to make-up school!  Today is the second session of our brush class and we’re focusing on the best tools for blushing and bronzing. 

Cheekbones (powder blush): Look for natural hair bristles and an angled tip to perfectly sculpt and shape cheekbones. To find where yours are, look in the mirror and suck in your cheeks, then work the brush directly on them using short strokes as you make your way across towards your ears.
Apples (powder blush): Look for natural bristles and a plump body with a pointed tip for the best precision when applying blush to the apples of your cheeks.  To find where yours are, look in the mirror and smile; your apples will literally pop out like little golf balls.  Swirl the blush in circular motions directly on top of them.
Stippling (cream blush): Look for synthetic bristles in two layers that are different colors, a dark set that is dense and short and a lighter set that is long and sparse. This design picks up two layers when you gently dip it in your cream blush, allowing for different outcomes when swirling it from the apples across your cheekbones (light pressure = sheer finish, heavier pressure = satin finish). Then blend edges with your fingers.
Contouring (cream or powder bronzer): Look for synthetic bristles if you are using a cream bronzer or a cream foundation three shades darker than your skin tone; look fornatural bristles if you are using a bronzing powder.  Using short strokes, trace the product directly under your cheekbone in the hollows of your cheeks, up to your temples, across your hairline and under your jawline.  For a refresher course on contouring, click here to see Lauren’s demonstration in six steps.
Highlighting (loose or pressed highlighting powder): Look for natural bristles in a fan shape that feel light and airy on your skin. This design is perfect for sweeping a shimmery highlighting powder directly above your cheekbones using light, downward strokes. Bonus: fan brushes were originally developed to “dust” away excess powder or shadow particles, so next time you create a smoky eye and there are little black shadow droppings that have fallen on your cheeks, use your fan brush like a duster to sweep them away.
Bronzing (loose or pressed powder bronzer): Look for natural bristles with a rounded head for the most even application.  Unlike using bronzer for contouring, here we’re using it to look sunkissed, so this brush design is ideal to evenly distribute, diffuse and blend the powder as you swirl it all over your face and neck.
Blending (everything!): This Botan Brush by NARS is the only one of its kind out there and a must-have splurge for serious make-up artists. It has short and dense naturalbristles that cover almost two inches in diameter and is the ultimate blender to use following blush, bronzer or powder application.  Bonus trick: if you use a foundation or bronzer that comes in a spray can, instead of applying it directly to your face, spray it in the palm of your hand, dip the Botan Brush in it then swirl it all over your face and neck for an airbrushed look that is simply gorgeous.

1 comment:

  1. This info would be great if I ever decide to dress in drag :)

    ReplyDelete